A friend of mine is interviewing and photographing people in Russia, a university project. She hasn’t used a camera before and has just bought a Nikon DSLR with a very nice Sigma f1.8 18-35mm zoom.
Clearly she failed to find anyone who knows what they are talking about, so she asked me for advice on using her camera for portraits.
I’ve already rambled on at her for an hour or two, but thought it would be helpful to write down some of what we went through.
Here goes. (By the way, by ‘portrait’ I mean a head and shoulders shot of a person.)
Portraits in a nutshell
Here’s the short version:
- Put a 50mm (or equivalent) lens on your camera
- Put your camera in A mode
- Set the aperture at f2.8 or below
- Frame the person in the viewfinder so you can see their head and shoulders
- Focus on the person’s eyes – you may want to switch to manual focus if you don’t trust your camera’s autofocus
- Change the ISO until the shutter speed is more than 1/200th and the ISO is as low as possible
- Take the picture
Portraits not in a nutshell
Here’s the longer version.
The first thing you need to understand about photography is exposure.
‘Exposure’ is how much light hits your camera sensor when you take a picture.
Too much light (over exposed) and the picture is whited out. Too little (under exposed) and it is all black. You’ve got some room to correct mistakes when you edit your photos, but if your picture is way over or under exposed, you won’t be able to correct it.
Where there was lovely detail, the camera will have recorded just black or white.Your camera will help you get the right* exposure, but it’s worth understanding how you control the amount of light hitting the sensor, and the side effects of those controls.
We’ve got two ways of controlling light (aperture and shutter) and a way of changing how the camera’s sensor reacts to light (ISO).
Aperture
The aperture is a set of blades in the lens that open and close to let more or less light in. It’s just making a bigger or smaller circle for the light to go through.
Aperture is measured in f-stops. A smaller ‘f’ number means a bigger circle with more light getting through.
Different lenses have different aperture ranges. A ‘fast’ lens will have a wide maximum aperture – say f1.4. f1.2 is really fast and only found on expensive lenses.
On many lenses the widest aperture is f2 or f2.8. Zoom lenses tend to have narrower minimum apertures, f4 and above sometimes.
At the other end of the scale most lenses have tiny minimum apertures – f22 or smaller.
So the wider the aperture (smaller the f number) the more light gets through. Which is great for low-light shooting.
But that’s not all there is to it. The aperture also affects depth of field. That’s how much of the picture is in focus.
The wider the aperture, the narrower the depth of field.
Why do we care about depth of field? For portraits, if the face is in focus and the background is blurred, then the person will stand out in the photo.
There are plenty of situations where you want everything in focus, which you can get using a small aperture. But for portraits, a narrow depth of field is usually** what you want.
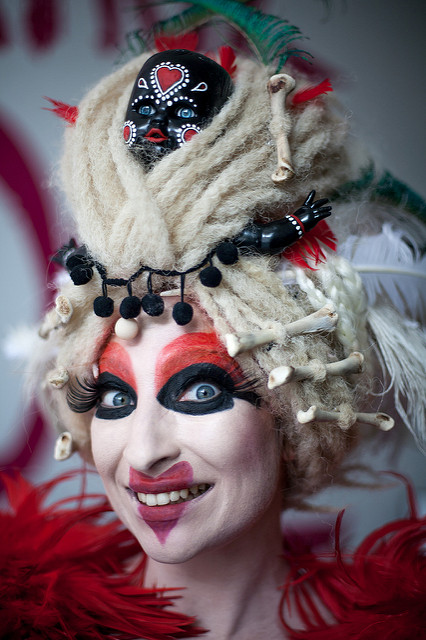
The Queen of Hearts. 50mm lens, 1/250th shutter speed, f1.4. The wide aperture means there’s a really narrow depth of field. Her eyes are in focus (generally** focus on the eyes) but the tip of her nose isn’t. The bits of the hairdo thing blur as they get further away. The background is completely blurred – the red shapes are letters on a huge sign. All of which helps focus attention on her face, and gives the pic a nice 3D look.
A poet. 50mm lens, 1/800th shutter speed, f2. Not quite such a wide aperture, but we’ve still got a really narrow depth of field The eyes are in focus, but not the nose or ears. And certainly not the background.
One more thing about depth of field. The further away you get from your subject, the deeper the depth of field. Both pictures above were taken close to the victim. If I’d kept the aperture the same but moved further away, more of the subject would have been in focus.
Personally, I like a really narrow depth of field. I like the nose and ears being out of focus. If you want the whole head in focus, decrease the aperture or step back a bit.
Shutter speed
The shutter is like a curtain that sits between your camera lens and the sensor. When you take a picture the curtain opens briefly to let light onto the camera’s sensor.
Shutter speeds are measured in seconds or fractions of a second. Most cameras have a range from around 30 seconds to 1/8000th.
The longer the shutter is open, the more light hits the sensor. So on a bright day you’ll need a fast shutter speed to limit the light so you don’t over expose your picture. In a dark room you’ll need slower shutter speeds to let more light in.
But that’s not all there is to it. Fast shutter speeds will freeze motion.
The trouble with fast shutter speeds is that not much light is getting through, so you’ll need a bright subject and/or a wide aperture.
Use lower shutter speeds when there’s not much light around.
The trouble with slow shutter speeds (I’d call 1/60th or longer ‘slow’) is that moving objects will be blurred. If the camera moves the whole picture will be blurred.
I’ve got a tremor, so where possible I stick to shutter speeds above 200th of a second, which is enough to deal with any camera shake. Lots of people can hand hold a camera at 1/60th and get sharp photos (providing the subject isn’t moving). (The longer the focal length of your lens, the more you’ll notice camera shake.)
So, aperture and shutter control the amount of light hitting the sensor. And they work in unison. You can get the same amount of light on the sensor using a small aperture and slow shutter speed or using a wide aperture and fast shutter speed.
ISO
But what if you are in a dark room, you’ve opened up the aperture as far as it can go, and you’ve still got a stupid slow shutter speed?
Well, you could put your camera on a tripod and ask the subject to sit really still. That will take care of any shake or motion blur.
Or, more conveniently, you can use the camera’s ISO setting.
The ISO is how sensitive the camera’s sensor is to light.
At low ISO (say 100) the sensor isn’t very sensitive. So you need to let lots of light fall on it to get your picture. Which means wider apertures and slower shutter speeds.
At high ISO (say 10,000 – many cameras now go even higher) the sensor is really sensitive and hardly needs any light falling on it to get a picture. So you can use narrower apertures, and more usefully faster shutter speeds.
But there’s a price to pay. The higher the ISO the worse the image quality. You’ll get lovely smooth, detailed pictures at ISO 100. The higher the ISO the noisier the picture will get, especially in the dark areas, where you see grainy textures. At really high ISO your pictures will look like something from a CCTV camera or a mobile phone from the ’90s**.
The more modern the camera, generally the more usable the high ISO settings will be. Sensors are getting better all the time.
Controlling your camera
Your camera has lots of modes. We’re only interested in P, A, S and M. Your camera will have a dial on the top with these letters on it. All the other effects and scene modes just add nonsense to your pictures and/or take control away from you. Shun them.
P stands for ‘program’. Which means your camera is going to pick the aperture, the shutter speed and sometimes the ISO for you. How does it know what you want the picture to look like? It doesn’t, so shun that mode also.
A stands for aperture priority. This is usually** what you’ll be using for portraits. You control the aperture (and the ISO) and the camera takes care of the shutter speed. So, select a wide aperture, check the shutter speed, if it’s too low increase the ISO.
S stands for shutter priority. You pick the shutter speed, the camera picks the aperture. For portraits we want to control the aperture, so we shun this mode. It’s good for sports though. Taking pictures of sports is odd and should be shunned whatever camera setting you use to do it.
M stands for manual. You pick the shutter and aperture. Useful if you want to get the exposure you want, not what the camera wants. But for now let the camera decide. So don’t shun this mode, but leave it for when you find the camera isn’t making the choices you want.
A couple more things before we get started
You’ll want to set your camera up to take the highest quality, least interfered-with pictures.
You can apply effects, make pics black and white, save smaller versions, whatever, later on your computer, and still keep the nice, big, clean original file. You want the camera to interfere as little as possible with the file.
So find the camera’s image quality setting and set it to RAW. Not JPEG. RAW files come pretty much straight off the sensor. We want that. JPEG files are compressed (some information is thrown away) and often have sharpening and contrast effects applied by the camera. We don’t want that.
Set drive mode to single shot (the alternative is to rattle off loads of pictures when you press the shutter button. OK for sports, no need for portraits).
Set metering to ‘evaluative’, or ‘matrix’, or whatever sounds most whizzy. Metering is how the camera reads the light levels in the scene and decides what shutter and/or aperture to use. Matrix or evaluative means the camera reads the whole scene and uses some complex computer stuff to decide how to set the exposure. Your camera may have ‘partial’ and ‘spot’ meter modes. Ignore those for now.
Oh… and what lens to use
If you are taking a standard head and shoulders portrait, use a lens that’s between 50mm and 100mm (30mm to 60mm on a crop sensor camera).
You’ll be a sensible distance from your subject and they won’t be distorted.
Telephoto lenses (200mm and above) flatten people out and make them look weird. I’ve got a 500mm lens that makes my normally boyishly handsome friend Rick look like Donny Osmond. Not that there’s anything wrong with Donny Osmond, it’s just that in your actual life, Rick doesn’t look like him.
Rick. 500mm lens, 1/320th shutter speed, f8. The long focal length has flattened his face and made him look like Donny. I was miles away from Donny, I mean Rick, when I took this picture.
Rick. 28mm lens, f2.8, 1/125th. Rick looking his normal, boyish self. (OK, I’ve cheeated a bit. This is with a slightly wide lens so we’ve gone a bit in the other direction. But you get the point.)
Also with a long focal length you’ll be miles from your subject (sometimes this is desirable).
With a wide angle lenses (28mm and below) you’ll have to get really close to your victim for a head and shoulders shot, and they’ll be weirdly distorted***.
What does this mean in practice?
Here’s what I’m thinking about when I take a portrait.
OK, I’m on a train. It’s late afternoon. It’s overcast outside and the lights are on in the train. There’s not that much light around.
There’s a woman asleep opposite me, and I really like the reflections on her glasees.
I’ve got a 50mm lens on my camera – I generally do, it’s a useful , all purpose sort of focal length. She’s just the right distance away for a head and shoulders portrait shot.
I’ve already set my camera to aperture priority – it’s always set on that.
I want a narrow depth of field. I want her face in focus but I don’t want the carriage behind her to be in focus, it will be distracting. This picture is about the face and the glasses. Also it looks pretty dim in the carriage so a wide aperture will let as much light as possible in.
I set the aperture to f1.4 – as wide as this lens goes.
I’ve already noticed the light is dim, so I set the ISO to a sensitive 1000. I’m using an old camera, but it’s a good one and I know that shots taken at 1000 ISO won’t be too noisy.
Now I put the camera up to my eye, focus on her glasses, and check what shutter speed the camera has chosen. I’m looking for a shutter speed of around 1/200th or above to cancel camera shake from my tremor. It’s 1/1250th, which is faster than I was expecting. It’s not as dark as I thought. I could afford to drop the ISO a bit to improve the picture quality (and make the shutter speed slower).
But I need to take the picture quickly in case she or other passengers notice me taking sneaky photos. So I just take the pic as is.
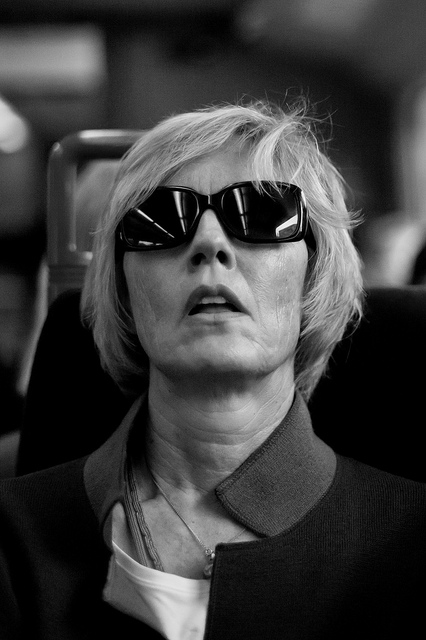
Sleeping woman. 50mm lens, 1/1250th shutter speed, f1.4, ISO 1000.
And there we go, exactly what I had in mind. Face and glasses in focus, background blurred. No sign of camera shake or motion blur.
Notice that I knew what I was after, so could set the camera up accordingly. It helps to have a vision for your shots, and know how to achieve that vision.
Next steps
Not getting the results you want?
Try with your victim in different lighting conditions. Outside on a sunny day, outside on a dull day, indoors lit from a widow, indoors with some lights on. Try with the light at one side, the other side, infront, behind even.
Try using a flash.
Think about how you interact with your victim. Get them to be serious. Make them laugh. Take pics when they aren’t expecting it. Tell them the camera isn’t working and take lots of pics while they think you are fixing it.
Want a more moody shot? Or something softer?
Play around with your pics in lightroom. If the camera’s idea of the right* exposure isn’t giving you the raw materials you need, find your camera’s exposure compensation. This will let you take pictures that are darker or lighter than the camera thinks they should be. Or try center-weighted or spot metering – take your meter reading from one part of your sitter, see how that affects the overall exposure.Generally, play around, see what you like.
Footnotes
* There’s no ‘right’ exposure. The camera is programmed to set shutter and aperture to get an average, middle-of-the-road exposure. Not too bright, not too dark. But that’s not ‘right’. What’s ‘right’ is how you want the picture to look. You may want it ‘too’ dark or ‘too’ light. It’s your choice.
** There are lots of general rules, but none of them are ‘right’. If you want a blurred photo, a photo where only someone’s ears are in focus, a photo that looks like it came from a first-generation CCTV camera, then that’s your artistic choice. Many of my favourite photos are weirdly framed, are over or under exposed, are blurred, are full of grain and noise.
I’m not saying take random shots without understanding what you are doing in the hope that you get something interesting. (Though that is fun, and digital photos cost nothing, so why not?)
Be in control, take weird photos because you want to, get the basic skills that will let you realise your vision however non-standard that vision is.
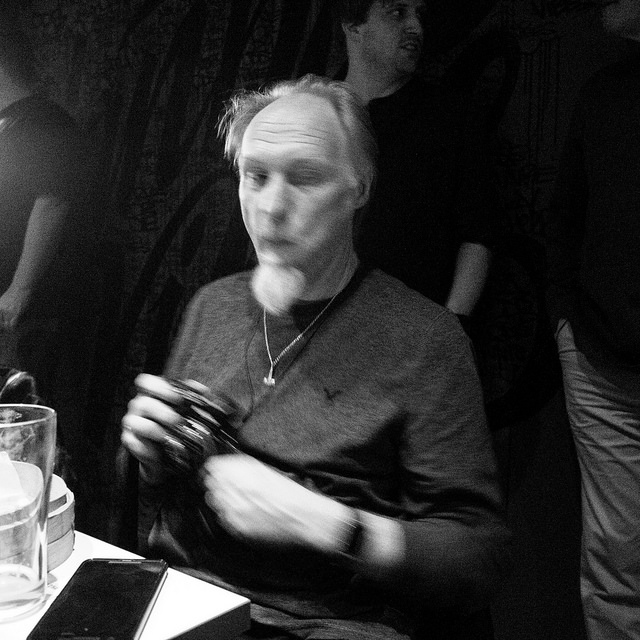
Beer and cameras. 28mm lens, 1/15th (yes, way slow), f2.8, ISO 12800 (a bit high). The slow shutter speed means he is blurred – I had the camera quite still, but he moved. The high ISO makes it grainy. But I like it a lot more than some technically better shots that I took at the same time.
*** I like taking portraits with a wide angle lens – I like the distortion.
Andrew. 20mm lens, 1/200th, f2.8. I’m just a few inches from his face.
Flo. 20mm lens, 1/200th, f2.8. Flo doesn’t really look like this.